Blog

  • alexa-typescript-lambda-helloworld

    Alexa Skill with TypeScript

    Alexa skills can be developed using Alexa Lambda functions or a REST API endpoint. Lambda function is Amazon’s implementation of serverless functions available in AWS. Amazon recommends using Lambda functions despite they are not easy to debug. While you can log to a CloudWatch log, you can’t hit a breakpoint and step into the code.

    This makes live debugging of Alexa requests a very hard task. In this post, we will implement a custom skill for Amazon Alexa by using TypeScript, npm and AWS Lambda Functions. This skill is basically a Hello World example. With this post you will be able to create a custom skill for Amazon Alexa, implement functionality by using TypeScript and start your custom skill both from your local computer and from AWS. This post contains materials from different resources that can be seen on Resources section.

    Prerequisites

    Here you have the technologies used in this project

    1. Amazon Developer Account – How to get it
    2. AWS Account – Sign up here for free
    3. ASK CLI – Install and configure ASK CLI
    4. Node.js v10.x
    5. TypeScript (Version >3.0.0)
    6. Visual Studio Code
    7. npm Package Manager
    8. Alexa ASK for Node.js (Version >2.7.0)
    9. ngrok

    The Alexa Skills Kit Command Line Interface (ASK CLI) is a tool for you to manage your Alexa skills and related resources, such as AWS Lambda functions. With ASK CLI, you have access to the Skill Management API, which allows you to manage Alexa skills programmatically from the command line. We will use this powerful tool to create, build, deploy and manage our Hello World Skill but now, with TypeScript. Let’s start!

    Creating the Skill with ASK CLI

    If you want how to create your Skill with the ASK CLI, please follow the first step explained in my Node.js Skill sample

    Once we have created the Skill in Node.js, we have to rewrite or ‘transpile’ our code to TypeScript. I have made that work for you. Let’s take a look on it!

    Project Files

    These are the main files of the project:

        ├───.ask/
        │       config
        ├───.vscode/
        │       launch.json
        ├───hooks/
        ├───lambda/
        │   └───custom/
        │       │   └───build/
        │       │   local-debugger.js
        │       │   package.json
        │       │   tsconfig.json
        │       │   tslint.json
        │       └───src/
        │           ├───index.ts
        │           ├───errors/
        │           ├───intents/
        │           ├───interceptors/
        │           └───utilities/
        │
        ├───models/
        └───skill.json
    
    • .ask: folder which contains the ASK CLI’s config file. This config files will remain empty until we execute the command ask deploy
    • .vscode/launch.json: Launch preferences to run locally your Skill for local testing. This setting launch lambda/custom/src/local-debugger.js. This script runs a server on http://localhost:3001 for debug the Skill. It is not traspilled to TypeScript because it is not a part from our lambda. It is a local tool.
    • hooks: A folder that contains the hook scripts. Amazon provides two hooks, post_new_hook and pre_deploy_hook
      • post_new_hook: executed after the Skill creation. Inn Node.js runs npm install in each sourceDir in skill.json
      • pre_deploy_hook: executed before the Skill deployment. In Node.js runs npm install in each sourceDir in skill.json as well
    • lambda/custom/src: A folder that contains the source code for the skill’s AWS Lambda function:
      • index.ts: the lambda main entry point
      • package.json: this file is core to the Node.js ecosystem and is a basic part of understanding and working with Node.js, npm, and even modern TypeScript
      • tsconfig.json: configuration file that we are going to use for compiling our TypeScript code
      • tslint.json: configuration file used by gts (Google TypeScript Style) to check the style of our TypeScript code
      • local-debugger.js: used for debug our skill locally
      • errors: folder that contains all error handlers
      • intents: this one contains all the intent handlers
      • interceptors: interceptors’ folder with the i18n initialization
      • utilities: this folder contains the i18n strings, helper functions, constants and TypeScript interfaces
      • build: the output folder after compiling the TypeScript code
    • models – A folder that contains interaction models for the skill. Each interaction model is defined in a JSON file named according to the locale. For example, es-ES.json
    • skill.json – The skill manifest. One of the most important files in our project

    Lambda function in TypeScript

    The ASK SDK for Node.js makes it easier for you to build highly engaging skills by allowing you to spend more time implementing features and less time writing boilerplate code.

    We are going to use this SDK but now in TypeScript!

    You can find documentation, samples and helpful links in their official GitHub repository

    The main TypeScript file in our lambda project is index.ts located in lambda/custom/src folder. This file contains all handlers, interceptors and exports the Skill handler in exports.handler.

    The exports.handler function is executed every time AWS Lambda is initiated for this particular function. In theory, an AWS Lambda function is just a single function. This means that we need to define dispatching logic so a single function request can route to appropriate code, hence the handlers.

      import * as Alexa from 'ask-sdk-core';
      import { Launch } from './intents/Launch';
      import { Help } from './intents/Help';
      import { Stop } from './intents/Stop';
      import { Reflector } from './intents/Reflector';
      import { Fallback } from './intents/Fallback';
      import { HelloWorld } from './intents/HelloWorld';
      import { ErrorProcessor } from './errors/ErrorProcessor';
      import { SessionEnded } from './intents/SessionEnded';
      import { LocalizationRequestInterceptor } from './interceptors/LocalizationRequestInterceptor';
    
      export const handler = Alexa.SkillBuilders.custom()
        .addRequestHandlers(
          // Default intents
          Launch,
          HelloWorld,
          Help,
          Stop,
          SessionEnded,
          Reflector,
          Fallback
        )
        .addErrorHandlers(ErrorProcessor)
        .addRequestInterceptors(LocalizationRequestInterceptor)
        .lambda();

    It is important to take a look into the Launch.ts, imported as Launch above, which is the LaunchRequestHandler handler located in the intents folder as an example of Alexa Skill handler written in TypeScript:

      import { RequestHandler, HandlerInput } from 'ask-sdk-core';
      import { RequestTypes, Strings } from '../utilities/constants';
      import { IsType } from '../utilities/helpers';
      import i18n from 'i18next';
    
      export const Launch: RequestHandler = {
        canHandle(handlerInput: HandlerInput) {
          return IsType(handlerInput, RequestTypes.Launch);
        },
        handle(handlerInput: HandlerInput) {
          const speechText = i18n.t(Strings.WELCOME_MSG);
    
          return handlerInput.responseBuilder
            .speak(speechText)
            .reprompt(speechText)
            .withSimpleCard(i18n.t(Strings.SKILL_NAME), speechText)
            .getResponse();
        },
      };

    Building the Skill with Visual Studio Code

    Inside package.json, we will almost always find metadata specific to the project. This metadata helps identify the project and acts as a baseline for users and contributors to get information about the project.

    Here is how this file looks like:

      {
        "name": "alexa-typescript-lambda-helloworld",
        "version": "1.0.0",
        "description": "Alexa HelloWorld example with TypeScript",
        "main": "index.js",
        "scripts": {
          "clean": "rimraf build",
          "compile": "tsc --build tsconfig.json --pretty",
          "build-final": "cpy package.json build && cd build/ && npm install --production",
          "test": "echo \"No test specified yet\" && exit 0",
          "lint-check": "gts check",
          "lint-clean": "gts clean",
          "lint-fix": "gts fix",
          "build": "npm run clean && npm run test && npm run lint-check && npm run compile && npm run build-final"
        },
        "repository": {
          "type": "git",
          "url": "https://github.com/xavidop/alexa-typescript-lambda-helloworld.git"
        },
        "author": "Xavier Portilla Edo",
        "license": "Apache-2.0",
        "dependencies": {
          "ask-sdk-core": "^2.7.0",
          "ask-sdk-model": "^1.19.0",
          "aws-sdk": "^2.326.0",
          "i18next": "^15.0.5",
          "i18next-sprintf-postprocessor": "^0.2.2"
        },
        "devDependencies": {
          "@types/node": "^10.10.0",
          "@types/i18next-sprintf-postprocessor": "^0.2.0",
          "typescript": "^3.0.2",
          "cpy-cli": "^3.1.0",
          "rimraf": "^3.0.0",
          "ts-node": "^7.0.1",
          "gts": "^1.1.2"
        }
      }


    With TypeScript we have to compile our code to generate the JavaScript code. For build our Skill, we can run the following command:

      npm run build
    

    This command will execute these actions:

    1. Remove the build folder located in lambda/custom with the command rimraf build. This folder contains the output of compiling the TypeScript code
    2. Check the style of our TypeScript code with the command gts check using the file tslint.json
    3. Compiles the TypeScript and generates the JavaScript code in the output folder lambda/custom/build using the command tsc --build tsconfig.json --pretty
    4. Copy the package.json to the build folder because is needed to generate the final lambda code
    5. Finally, it will run the npm install --production in build folder to get the final lambda code that we are going to upload to AWS with the ASK CLI.

    As you can see, this process in a TypeScript environment is more complex than in JavaScript one.

    Running the Skill with Visual Studio Code

    The launch.json file in .vscode folder has the configuration for Visual Studio Code which allow us to run our lambda locally:

      {
          "version": "0.2.0",
          "configurations": [
              {
                  "type": "node",
                  "request": "launch",
                  "name": "Launch Skill",
                  // Specify path to the downloaded local adapter(for nodejs) file
                  "program": "${workspaceRoot}/lambda/custom/local-debugger.js",
                  "args": [
                      // port number on your local host where the alexa requests will be routed to
                      "--portNumber", "3001",
                      // name of your nodejs main skill file
                      "--skillEntryFile", "${workspaceRoot}/lambda/custom/build/index.js",
                      // name of your lambda handler
                      "--lambdaHandler", "handler"
                  ]
              }
          ]
      }
    

    This configuration file will execute the following command:

      node --inspect-brk=28448 lambda\custom\local-debugger.js --portNumber 3001 --skillEntryFile lambda/custom/build/index.js --lambdaHandler handler
    

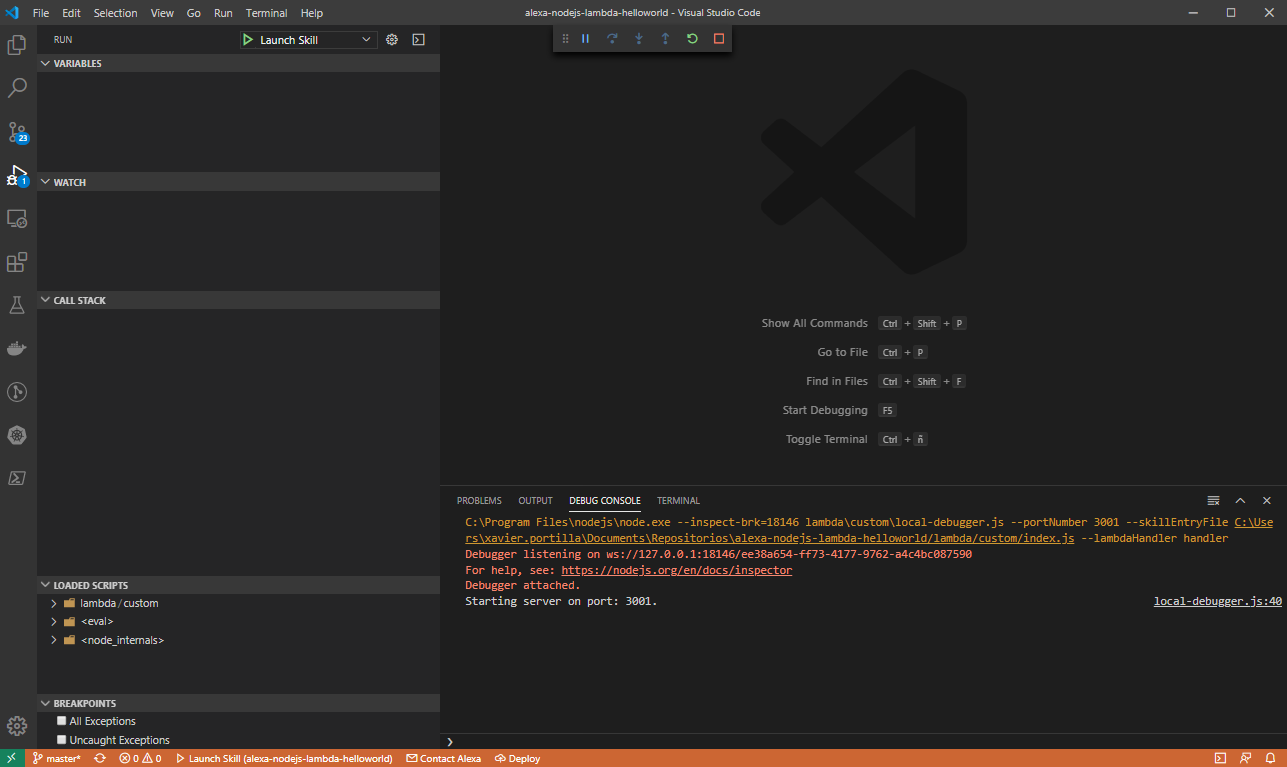
    This configuration uses the local-debugger.js file which runs a TCP server listening on http://localhost:3001

    For a new incoming skill request a new socket connection is established. From the data received on the socket the request body is extracted, parsed into JSON and passed to the skill invoker’s lambda handler. The response from the lambda handler is parsed as a HTTP 200 message format as specified here The response is written onto the socket connection and returned.

    After configuring our launch.json file and understanding how the local debugger works, it is time to click on the play button:

    image

    After executing it, you can send Alexa POST requests to http://localhost:3001.

    Debugging the Skill with Visual Studio Code

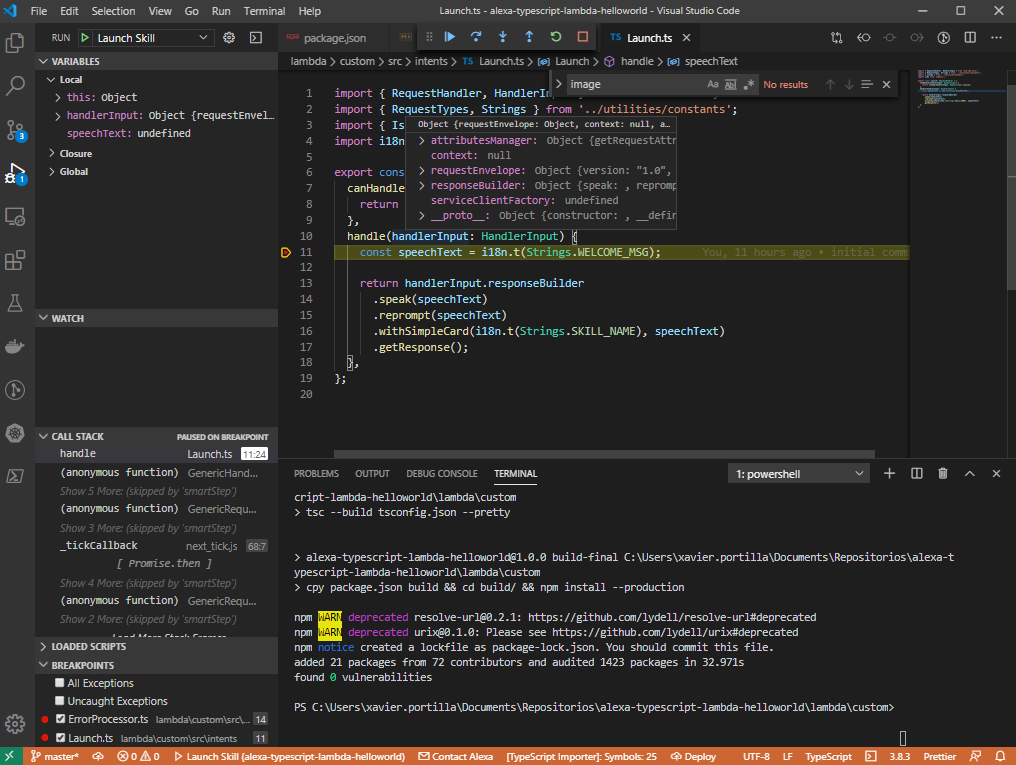
    Following the steps before, now you can set up breakpoints wherever you want inside all TypeScript files in order to debug your skill:

    image

    Testing requests locally

    I’m sure you already know the famous tool call Postman. REST APIs have become the new standard in providing a public and secure interface for your service. Though REST has become ubiquitous, it’s not always easy to test. Postman, makes it easier to test and manage HTTP REST APIs. Postman gives us multiple features to import, test and share APIs, which will help you and your team be more productive in the long run.

    After run your application you will have an endpoint available at http://localhost:3001. With Postman you can emulate any Alexa Request.

    For example, you can test a LaunchRequest:

      {
        "version": "1.0",
        "session": {
          "new": true,
          "sessionId": "amzn1.echo-api.session.[unique-value-here]",
          "application": {
            "applicationId": "amzn1.ask.skill.[unique-value-here]"
          },
          "user": {
            "userId": "amzn1.ask.account.[unique-value-here]"
          },
          "attributes": {}
        },
        "context": {
          "AudioPlayer": {
            "playerActivity": "IDLE"
          },
          "System": {
            "application": {
              "applicationId": "amzn1.ask.skill.[unique-value-here]"
            },
            "user": {
              "userId": "amzn1.ask.account.[unique-value-here]"
            },
            "device": {
              "supportedInterfaces": {
                "AudioPlayer": {}
              }
            }
          }
        },
        "request": {
          "type": "LaunchRequest",
          "requestId": "amzn1.echo-api.request.[unique-value-here]",
          "timestamp": "2020-03-22T17:24:44Z",
          "locale": "en-US"
        }
      }
    

    Deploying your Alexa Skill

    With the code ready to go, we need to deploy it on AWS Lambda so it can be connected to Alexa.

    Before deploy the Alexa Skill, we can show the config file in .ask folder it is empty:

        {
          "deploy_settings": {
            "default": {
              "skill_id": "",
              "was_cloned": false,
              "merge": {}
            }
          }
        }
    

    Deploy Alexa Skill with ASK CLI:

        ask deploy

    As the official documentation says:

    When the local skill project has never been deployed, ASK CLI creates a new skill in the development stage for your account, then deploys the skill project. If applicable, ASK CLI creates one or more new AWS Lambda functions in your AWS account and uploads the Lambda function code. Specifically, ASK CLI does the following:

    1. Looks in your skill project’s config file (in the .ask folder, which is in the skill project folder) for an existing skill ID. If the config file does not contain a skill ID, ASK CLI creates a new skill using the skill manifest in the skill project’s skill.json file, then adds the skill ID to the skill project’s config file.
    2. Looks in your skill project’s manifest (skill.json file) for the skill’s published locales. These are listed in the manifest.publishingInformation.locales object. For each locale, ASK CLI looks in the skill project’s models folder for a corresponding model file (for example, es-ES.json), then uploads the model to your skill. ASK CLI waits for the uploaded models to build, then adds each model’s eTag to the skill project’s config file.
    3. Looks in your skill project’s manifest (skill.json file) for AWS Lambda endpoints. These are listed in the manifest.apis..endpoint or manifest.apis..regions..endpoint objects (for example, manifest.apis.custom.endpoint or manifest.apis.smartHome.regions.NA.endpoint). Each endpoint object contains a sourceDir value, and optionally a uri value. ASK CLI upload the contents of the sourceDir folder to the corresponding AWS Lambda function and names the Lambda function the same as the uri value. For more details about how ASK CLI performs uploads to Lambda, see AWS Lambda deployment details.
    4. Looks in your skill project folder for in-skill products, and if it finds any, uploads them to your skill. For more information about in-skill products, see the In-Skill Purchasing Overview.

    After the execution of the above command, we will have the config file properly filled:

      {
        "deploy_settings": {
          "default": {
            "skill_id": "amzn1.ask.skill.945814d5-9b30-4ee7-ade6-f5ef017a1c17",
            "was_cloned": false,
            "merge": {},
            "resources": {
              "manifest": {
                "eTag": "ea0bd8c176a560f95a64fe7a1ba99315"
              },
              "interactionModel": {
                "es-ES": {
                  "eTag": "4a185611054c722446536c5659593aa3"
                }
              },
              "lambda": [
                {
                  "alexaUsage": [
                    "custom/default"
                  ],
                  "arn": "arn:aws:lambda:us-east-1:141568529918:function:ask-custom-alexa-typescript-lambda-helloworld-default",
                  "awsRegion": "us-east-1",
                  "codeUri": "lambda/custom/build",
                  "functionName": "ask-custom-alexa-typescript-lambda-helloworld-default",
                  "handler": "index.handler",
                  "revisionId": "477bcf34-937d-4fa4-8588-8db8ec1e7213",
                  "runtime": "nodejs10.x"
                }
              ]
            }
          }
        }
      }
    

    NOTE: after rewriting our code to TypeScript we need to change the codeUri from lambda/custom to lambda/custom/build because of our code compiled from TypeScript to JavaScript goes to the output folder build.

    Test requests directly from Alexa

    ngrok is a very cool, lightweight tool that creates a secure tunnel on your local machine along with a public URL you can use for browsing your local site or APIs.

    When ngrok is running, it listens on the same port that you’re local web server is running on and proxies external requests to your local machine

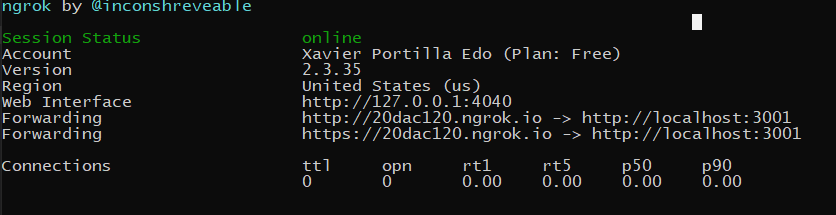
    From there, it’s a simple step to get it to listen to your web server. Say you’re running your local web server on port 3001. In terminal, you’d type in: ngrok http 3001. This starts ngrok listening on port 3001 and creates the secure tunnel:

    image

    So now you have to go to Alexa Developer console, go to your skill > endpoints > https, add the https url generated above . Eg: https://20dac120.ngrok.io.

    Select the My development endpoint is a sub-domain…. option from the dropdown and click save endpoint at the top of the page.

    Go to Test tab in the Alexa Developer Console and launch your skill.

    The Alexa Developer Console will send a HTTPS request to the ngrok endpoint (https://20dac120.ngrok.io) which will route it to your skill running on Web API server at http://localhost:3001.

    Resources

    Conclusion

    This was a basic tutorial to learn Alexa Skills using Node.js and TypeScript. As you have seen in this example, the Alexa Skill Kit for Node.js and the Alexa Tools like ASK CLI can help us a lot and also they give us the possibility to create skills in TypeScript in an easy way. I hope this example project is useful to you.

    That’s all folks!

    Happy coding!

    Visit original content creator repository https://github.com/xavidop/alexa-typescript-lambda-helloworld
  • weiward-staked-rewards-pool

    weiward-staked-rewards-pool

    license

    Solidity contracts for rewarding stakers.

    Currently includes:

    • Abstract base contract for staking one token and rewarding another.
    • Timed rate contract for releasing rewards over a period of time. May be reused for multiple rewards periods.
    • Uses OpenZeppelin Contracts for common paradigms.

    Table of Contents

    Install

    This repository requires some knowledge of:

    1. Install npm and pnpm, preferably using nvm or nvm-windows.

      nvm install 12.19.0
      nvm use 12.19.0
      npm i -g pnpm
      # Check installation
      node --version
      npm --version
      pnpm --version
    2. Install dependencies

      pnpm install

    Usage

    # Lint
    npm run lint
    # Compile contracts
    npm run compile
    # Generate TypeScript contract interfaces from ABI's (required for tests)
    npm run gen-types
    # Run tests
    npm run test
    # Deploy to buidlerevm
    npm run deploy
    # Verify on Etherscan
    npm run verify -- --network mainnet
    # Export ABI and addresses for deployed contracts to build/abi.json.
    npm run export -- --network mainnet
    # Export ABI and addresses for deployed contracts across all networks to build/abi.json.
    npm run export:all
    # Flatten a file
    npx truffle-flattener <file> > flattened/<file>

    Deploy

    After installing dependencies, you may run all deployments (NOT RECOMMENDED) or you may deploy specific contracts by specifying tags.

    Copy .env.example to .env and replace the fields with your credentials. See the section on .env Variables for a description of each variable.

    Currently, you may deploy contracts using either a local node or Infura.

    # Install dependencies
    pnpm install
    # Deploy all contracts to buidlerevm
    npx run deploy

    .env Variables

    Variable Type Description Default
    MNEMONIC string The mnemonic for your wallet needed to deploy from your account. The default is always used for the buidlerevm network. Ganache does not require this either. system disease spend wreck student immune domain mind wish body same glove
    INFURA_TOKEN string The Infura Project ID needed to use Infura.
    ETHERSCAN_API_KEY string Your API key for verifying contracts on Etherscan.
    DEPLOYER_ACCOUNT_INDEX int The index in your wallet of the account you would like to use for deploying contracts. 0
    TESTER_ACCOUNT_INDEX int The index in your wallet of an account you would like to use when running npm run test. 1

    Available Networks

    The deploy process currently supports the following named networks. More can be added easily in buidler.config.ts.

    npx buidler deploy --network http://127.0.0.1:8545
    Network URL Description
    buidlerevm N/A The default network and EVM made by Buidler. Ideal for testing.
    localhost http://127.0.0.1:8545 A local node for testing. DO NOT use for live networks.
    ganache http://127.0.0.1:7545 The default ganache port.
    production http://127.0.0.1:8545 A local node running a live network
    goerli_infura https://goerli.infura.io/v3/${INFURA_TOKEN} Infura project endpoint for the Görli testnet.
    kovan_infura https://kovan.infura.io/v3/${INFURA_TOKEN} Infura project endpoint for the Kovan testnet.
    rinkeby_infura https://rinkeby.infura.io/v3/${INFURA_TOKEN} Infura project endpoint for the Rinkeby testnet.
    ropsten_infura https://ropsten.infura.io/v3/${INFURA_TOKEN} Infura project endpoint for the Ropsten testnet.
    mainnet_infura https://mainnet.infura.io/v3/${INFURA_TOKEN} Infura project endpoint for the Ethereum mainnet.

    Contract Tags

    yLandWETHUNIV2Pool

    contract: StakedRewardsPoolTimedRate.sol

    # Deploy using a local node
    npx buidler deploy --network production --tags yLandWETHUNIV2Pool
    # Deploy to ropsten using Infura
    npx buidler deploy --network ropsten_infura --tags yLandWETHUNIV2Pool
    # Deploy to mainnet using Infura
    npx buidler deploy --network mainnet_infura --tags yLandWETHUNIV2Pool

    Out in the Wild

    Disclaimer: This document does not serve to endorse or promote any project referenced below, whether expressly, by implication, estoppel or otherwise. This document does not serve as permission to use the name of the copyright holder nor the names of its contributors to endorse or promote any projects referenced below.

    yLand Liquidity Farming

    As of October 16th, 2020, Yearn Land is using StakingRewardsPoolTimedRate (the yLandWETHUNIV2Pool deployment tag) to offer farming yLand by staking a Uniswap liquidity pair. It is a rewards pool for staking yLand-WETH UNI-V2 pair tokens and earning yLand as a reward over a defined period of time. Once yLand is deposited to the contract, an administrator may update the contract to increase the reward schedule for the current or future staking period.

    Contributing

    1. Fork it
    2. Create your feature or fix branch (git checkout -b feature/fooBar)
    3. Commit your changes (git commit -am 'Add some fooBar')
    4. Push to the branch (git push origin feature/fooBar)
    5. Create a new Pull Request

    License

    weiward-staked-rewards-pool is licensed under the terms of the MIT License. See LICENSE for more information.

    Visit original content creator repository https://github.com/weiWard/weiward-staked-rewards-pool
  • resources

    Resources

    A list of different misc resources from the discord.

    WE ARE NOT RESPONSIBLE FOR MISUSE. USE AT YOUR OWN RISK. IF YOU DO NOT KNOW WHAT YOU ARE DOING, DON’T DO IT. WE DO NOT ENDORSE ILLEGAL ACTIVITY. THIS IS FOR EDUCATIONAL PURPOSES ONLY.

    Feel free to make a pull request to add new things!

    Please use the markdown syntax:

    - [FREE or PAID if applicable] [Name of Site](https://link.here) - a brief description. *(Your Username)*

    Generally, links are organized from bottom to top with bottom being more recent.

    Tools & Programs

    Web Tools & Services

    Darkweb

    WE ARE NOT RESPONSIBLE FOR MISUSE. USE AT YOUR OWN RISK. IF YOU DO NOT KNOW WHAT YOU ARE DOING, DON’T DO IT.

    Lists & Bookmarks

    Notes & Writeups

    Books

    Malware Analysis & Databases

    Practice

    Wordlists

    Visit original content creator repository
    https://github.com/CosmodiumCS/resources

  • rats

    Rats

    Rats is an experimental, type-level functional programming library for Rust,
    based heavily on Scala’s Cats (which itself is based heavily on Scalaz). There have been a few explorations in this space,
    but I believe Rats takes it much further than was previously possible.

    Rats has a few goals:

    1. Implement functional abstractions as close to zero-cost as can be achieved, while still maintaining the usefulness
      of these abstractions. This is a delicate balance.
    2. Explore functional programming in the context of Rust.
    3. Learn more about FP, and get better at Rust.

    At the moment, Rats relies on a non-zero cost embedding of higher-kinded types. For this reason, Rats is probably not
    appropriate for performance critical programs. However, it does enable some powerful abstractions that might be useful
    in less performance-critical applications. For more on the HKT embedding and how it works, see lifted.rs.

    Due to the performance constraints, Rats will likely only be of interest to Rust programmers curious about functional
    programming, and to functional programmers who are curious about Rust. At the moment, it is a single person’s labor of
    madness and unemployment, but there are lots of areas where Rats can be expanded, and I’d be very happy to accept
    contributions.

    Contributing

    TODO

    Thanks

    A huge thanks to the Cats project and contributors, who are responsible for everything I know about type-level
    functional programming.

    And Finally

    Rats is dedicated to Ada, Beorn, Basil, Elsie, Gracie, Rosie, Sally, Two-of-Three and Yuri. Their lifetime’s were
    much too short.

    Visit original content creator repository
    https://github.com/daviswahl/rats

  • play-store-autoscale

    play-store-autoscale

    this script in combination with a cronjob or any other trigger from your CI
    system can take care of scaling a release on play-store automatically.
    Optionally it can also inform your colleagues in a slack channel.

    Requirements

    • play store service account + json with credentials, see usage 1.
    • python 3.x
    • pip for installing required modules
    • install requirements via pip install -r requirements.txt (where u execute)

    Usage

    1. get play store service account and download json with access tokens, here is
      a nice
      explanation
    2. export path to google-play-service.json
    3. Configure script with your app id, decide on track and scaling scheme
    4. The script is configured to scale two next level whenever triggeredr.
      It picks up the user fraction / scale of an in-progress app.
      You can tweak function scale to your needs.
    5. Configure a cronjob or a job on your CI system that triggers the script,
      e.g. daily
    6. (Optional) For slack notifications configure a webhook and set SLACK_URL to it

    Usage of Docker image

    With a docker you can put your secret client json, slack webhook and module
    requirements into one nice package and deploy it to your CI registry (never public).

    1. copy google-play-service.json to the project
    2. docker build -t playstore-autoscale .
    3. docker tag playstore-autoscale your.docker.registry/playstore-autoscale:0.1
      4.docker push your.docker.registry/playstore-autoscale:0.1
    4. run on you CI system job or manually, e.g:
      docker run -it --rm --name playstore-autoscale playstore-autoscale

    Used libs

    Credit

    inspired by
    gradle-play-publisher
    doing an full app checkout and gradle run seemed overkill to just bump up
    scaling number for this use case, for app releases this is very good

    Visit original content creator repository
    https://github.com/k3muri84/play-store-autoscale

  • accept-payments

    Accept Payments

    Explore top payment methods to learn how you can build with Rapyd in a single integration offering customers their preferred local payment features.

    What do you need to start

    • Rapyd Account (https://dashboard.rapyd.net/sign-up)
    • In order for webhooks to work properly it is necessary to expose the corresponding port of your computer to the outside world (by default port 5000). There are many ways to achieve this. You can use the ngrok application (https://ngrok.com) which will generate a random web address for you and redirect all traffic to a specified port on your local machine
    • Node.js and npm

    How to run a sample application

    • Log in to your Rapyd account
    • Make sure you are using the panel in “sandbox” mode (switch in the bottom left part of the panel)
    • Go to the “Developers” tab. You will find your API keys there. Copy them to the version of your sample application of your choice
    • Go to the “Webhooks” tab and enter the URL where the application listens for events. By default it is “https://{YOUR_BASE_URL}/api/webhook” and mark which events should be reported to your app
    • Run the version of the application of your choice

    How to run a sample application frontend

    • Open /front/js/config.js file and type your backend URL (by default “http://localhost:5000/api/“)
    • Open terminal and type “npm install http-server -g”
    • Open terminal in /front directory and type “http-server”.
    • Turn on your browser and go to “http://localhost:8080

    Get Support

    Visit original content creator repository
    https://github.com/Rapyd-Samples/accept-payments

  • hmac-symmetric

    hmac-symmetric

    A library for simple symmetric encryption with HMAC digests

    npm version Verify Coverage Status

    Summary

    A zero dependency node library with basic functions for using symmetric encryption with HMAC digests. A a simple, small, configurable, and reusable set of functions for payload integrity and authentication.

    TLDR; Skip to the example

    Applications

    This is a general purpose library that can be used in any application where an HMAC’d symmetrically encrypted payload is useful. Here’s a quick reminder of a couple of useful applications for this library:

    1. Bot Mitigation
      When the payload is a simple timestamp, roundtripping (get at the beginning and send at the end of input) can be used to force bots to take a “human” amount of time to submit a form or field. This is a deal breaker for any serious bot network. In my experience, this is the biggest step you can take to destroy bots and maintain user trust, but you have to procure/measure an accurate minimum human usage time.
    2. Integrity and Authenticity
      The base function of a hashcode is to ensure payload integrity (that it has been unaltered). When combined with a shared secret (HMAC), this also ensures authtenticity. If there are services on your network that will receive a data block that originated from the a trusted source, this can be used to verify the integrity and authenticity of that data block, no matter how many hands it went through in between.

    API

    This library uses the environment variables

    • HS_HMAC_SECRET
    • HS_ENCRYPTION_KEY

    As the default source for keys for cryptographic functions.
    For more information see:

    1. For HMAC secret key
    2. For Encryption/Decryption key
    3. And caveats for using strings as inputs for cryptographic APIs

    To NOT use environment variables, supply options hmacSecret and encryptionKey.

    Methods this library exports:

    encryptAndDigest

    Symmetrically encrypt data and generate an HMAC digest for it.
    encryptAndDigest (input [, options]) : { payload, digest }

    • {String|Buffer|TypedArray|DataView} input – The data to encrypt
    • {Object} [options] – Optional options for generateHmac and symmetricEncrypt
    • Returns {Object} with payload and digest properties for the encrypted payload and the hmac digest.

    decryptAndTest

    Symmetrically decrypt data and test it’s HMAC digest against an original.
    decryptAndTest (originalDigest, encryptedInput [, options]) : { ok, decrypted }

    • {String} originalDigest – The original hmac digest to test against.
    • {String} encryptedInput – The encrypted input data string.
    • {Object} [options] – Optional options for generateHmac and symmetricDecrypt
    • Returns {Object} with ok and decrypted properties for the test result and the decrypted payload.

    generateHmac

    Generate an HMAC digest using the HMAC secret.
    generateHmac (input [, options]) : String

    • {String|Buffer|TypedArray|DataView} input – Input data.
    • {Object} [options] – Optional options.
    • {String} [options.inputEncoding] – Applied if input is a String. Default ‘utf8’.
    • {String} [options.hmacAlgo] – Algo used to create HMAC. Default ‘sha256’.
    • {String} [options.hmacSecret] – Secret to use. Defaults to environment variable HS_HMAC_SECRET.
    • Returns {String} of a hex encoded HMAC digest.

    symmetricEncrypt

    Symmetrically encrypt the input using an encryption key.
    symmetricEncrypt (input [, options]) : String

    • {String|Buffer|TypedArray|DataView} input – The data to encrypt.
    • {Object} [options] – Optional options.
    • {String} [options.encryptionAlgo] – Symmetric cipher algo, defaults to ‘aes-256-cbc’.
    • {String} [options.encryptionKey] – Symmetric cipher key. Defaults to environment variable HS_ENCRYPTION_KEY.
    • {String} [options.inputEncoding] – Encoding if the input is a String. Defaults to ‘utf8’.
    • Returns {String} hex encoded encryption of the input.

    symmetricDecrypt

    Symmetrically decrypt an encrypted input using an encryption key.
    symmetricDecrypt (input [, options]) : String

    • {String} input – The encrypted data.
    • {Object} [options] – Optional options.
    • {String} [options.encryptionAlgo] – Symmetric cipher algo, defaults to ‘aes-256-cbc’.
    • {String} [options.encryptionKey] – Symmetric cipher key. Defaults to environment HS_ENCRYPTION_KEY.
    • {Boolean} [options.outputBuffer] – true to return the Buffer result, false to convert buffer to string. Defaults to false.
    • Returns {String|Buffer} for the decrypted data as requested.

    HSError

    The class used by this library to throw errors.
    Useful for determining hmac-symmetric specific error source.
    class HSError, constructor (hsErrorType, originalError)

    HSError.HSE_HMAC

    Error property hseType will be equal to HSError.HSE_HMAC if error occurred during HMAC generation.

    HSError.HSE_ENCRYPT

    Error property hseType will be equal to HSError.HSE_ENCRYPT if error occurred during encryption.

    HSError.HSE_DECRYPT

    Error property hseType will be equal to HSError.HSE_DECRYPT if error occurred during decryption.

    Example

    Encryption/decryption usage with top level helper API using hmacSecret and encryptionKey (instead of using environment variables HS_HMAC_SECRET and HS_ENCRYPTION_KEY).

    import crypto from 'node:crypto';
    import { HSError, encryptAndDigest, decryptAndTest } from '@localnerve/hmac-symmetric';
    
    // Create demo input and phony keys for demo only.
    const input = 'hello world';
    const hmacSecret = crypto.randomBytes(32);
    const encryptionKey = crypto.randomBytes(32);  
    console.log(input);
      // hello world
    
    try {
      const encrypted = encryptAndDigest(input, {
        hmacSecret,
        encryptionKey
      });
      console.log(encrypted);
        // {
        //   digest: 'd3d6a6f1b2723f001c8c4ff4b28d0b310899c5eefbdbece184d62fcd8a4d712e',
        //   payload: '1f59ccab850189d7906db63f7f087d0f:957c9fe80c93033a8f9a9de0c0d73729'
        // }
    
      const decrypted = decryptAndTest(encrypted.digest, encrypted.payload, {
        hmacSecret,
        encryptionKey
      });
      console.log(decrypted);
        // { 
        //   ok: true,
        //   decrypted: 'hello world'
        // }
    
    } catch (e) {
      console.log(e.hseType);
        // HSE_HMAC, HSE_ENCRYPT, or HSE_DECRYPT
      console.log('hmac error', e.hseType === HSError.HSE_HMAC);
      console.log('encryption error', e.hseType === HSError.HSE_ENCRYPT);
      console.log('decryption error', e.hseType === HSError.HSE_DECRYPT);
    }

    LICENSE

    Visit original content creator repository https://github.com/localnerve/hmac-symmetric
  • MKNote

    MK Note

    Travis (.org) Codacy Badge GitHub tag (latest SemVer) GitHub Netlify Status

    MK Note is a note web app, which uses Markdown to render your notes.

    MK Note offers you:

    • Notes in Markdown: Write notes in Github falvored Markdown
    • Preview: Preview your written notes immediatly
    • Images: Drag and Drop images and store them along with your notes
    • Offline: Everything works totally offline, all the data is stored on your browser and on your machine – no fancy backend
    • Encrypted: All your note data is encrypted by a password
    • Sync: Even if its offline you can sync your notes over multi instances by running your own CouchDB backend
    • PWA: Install your app on your compouter, and use it offline

    screenshot.png

    Use MK Note

    Access your personal MK Note instance via: https://notes.moritzkanzler.com

    MK Note doesn’t rely on any backend, so every computer which access the website above, will get it’s own instance of MK Note immediatly.

    You even can install MK Note as an app on your computer with Chrome.

    Install

    If you dont want to use the tagged version of MK Note or contribute or extend it, just clone this repository and run the following command on your machine:

    yarn build
    

    The dist/ folder contains everything you need to host your own version MK Note.

    Develop

    Feel free and welcome to contribute or extend MK Note. All you need is to clone this repository run yarn install followed by yarn serve to recieve a hot-reloaded development environment.

    PRs are welcomed!

    Sync instances

    You can sync multiple instances over an own instance of CouchDB. The possibility is already implemented to do so. And a docker setup for hosting your own sync service will follow soon.

    Roadmap

    Current features plans for MK Note can be found under ROADMAP.md in this repository.

    Changelog

    The current changelog can be found under CHANGELOG.md in this repository.

    Visit original content creator repository https://github.com/Mo0812/MKNote
  • jupyter_publish

    Publication ready scientific reports and presentations with Jupyter notebooks

    • All source codes are provided under License: MIT
    • All documents are provided under License: CC BY 4.0

    Binder

    The main idea with this repository is to show how to share all the research objects that are part of a scientific workflow and provide a “fully” reproducible environment from one single entry point using Binder.

    coderefinery logo

    This workshop has been developed within the CodeRefinery project. CodeRefinery is funded by Nordic e-Infrastructure Collaboration (NeIC) and aims at advancing FAIRness of Software management and development practices so that research groups can collaboratively develop, review, discuss, test, share and reuse their codes. CodeRefinery also deliver 3-day workshops within the Nordic countries, namely in Iceland, Denmark, Norway, Sweden, Finland and Estonia.

    Step-1: Reproducible “research”

    Reading a scientific paper is usually only the first step and far insufficient to fully re-implement and understand what has been achieved. It gives the overall idea, and details on the methodology but very little information on how to do it yourself.

    Using Binder, you can read the paper and reproduce (and even re-generate) it.

    Let’s try it out here.

    The link above will open a JupyterLab on your browser with all the files and environment contained in this repository.

    You will learn later (following jupyter_publish-5.ipynb) how we created this repository with a fully reproducible environment that includes latex, matplotlib, etc. running with Binder.

    The workshop is organized with 5 sections from getting familiar with JupyterLab to share and publish your jupyter notebooks using Binder:

    The pdf document has been generated with the following command:

    nbpublish -f latex_ipypublish_all -pdf jupyter_publish
    

    Where jupyter_publish is this repository.

    Step-2: Beyond the state of the art

    Being able to reproduce what someone has published is the first step but our main motivation as a researcher is to use the paper we read as a starting point to go beyond the state of the art and generate new results (using new datasets or changing/adapting algorithms, etc.).

    Sharing your research objects with Binder makes this step much easier and can help you to be more visible as a researcher (by increasing the number of citations).

    Using a repository as a starting point for your new research work

    1. Import this repository directly on GitHub.

      Import repository

    Note: you may fork it instead if you are willing to keep a “link” with the original work.

    1. Once you have created your repository go to https://mybinder.org/

    2. Enter your repository address and make sure you replace coderefinery by your github username and press launch Import repository in Binder

    Note: if you are willing to start JupyterLab instead, add add:

     urlpath=lab/tree/index.ipynb
    

    so if your URL for starting Binder is https://mybinder.org/v2/gh/coderefinery/jupyter_publish/master/tree/index.ipynb it becomes

    https://mybinder.org/v2/gh/coderefinery/jupyter_publish/master?urlpath=lab/tree/index.ipynb

    Because in our case, we are willing to start from index.ipynb in the launched JupyterLab.

    Now we have “copied” the original repository with the same reproducible environment e.g. we can reproduce what has been done using Binder and we are now ready to make our own developments using our own Github repository.

    We now have our own Github repository where we can modify and add new developments and share them in the same way using Binder.

    Local installation (optional)

    If you need to install it on your laptop or any other computing platform.

    Visit original content creator repository https://github.com/coderefinery/jupyter_publish